Exchange Server 2007 was managed using Exchange Management Console (EMC) that was a part of Microsoft Management Console (MMC) snap-in with graphical user interface. Then, in Exchange 2010, a new interface called Exchange Control Panel (ECP) was introduced that was basically an improved version of EMC with "Options Page" section that allows managing Server if proper permissions were provided. In Exchange 2013, both EMC and ECP were eliminated and a new GUI web-based console was introduced that was named as Exchange Admin Center (EAC).
In this segment, we are going to discuss some basics about Exchange Admin Center that will help to get started with it and gives a way to manage Exchange 2013.
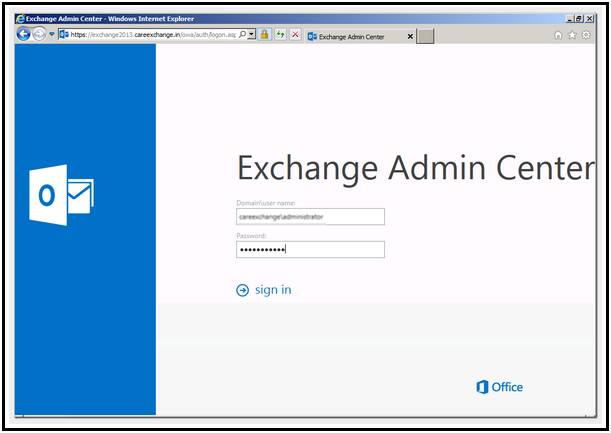
Since EAC is a web-based Exchange® management console, to access it you need to have Exchange Control Panel virtual directory URL available. There is a command called "New-EcpVirtualDirectory" which is automatically run when Exchange Server set up is installed. This virtual directory is responsible for managing EAC. To get internal and external link for ECP virtual directory, run the following command:
"Get-ECPVirtualDirectory | Format-List Name,InternalURL,ExternalURL"

Use the internal URL or external URL from the command result in order to login to Exchange Admin Center. Meanwhile, note that only shell can be used to detect the virtual directory URLs to access EAC in Exchange 2013.


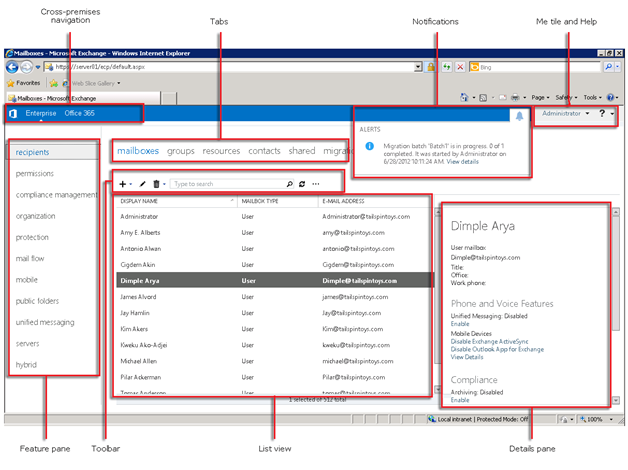
Different elements of Exchange Admin Center include:

This gives a simple medium to switch between Exchange on-premise and Exchange online. EAC is meant for all kind of Exchange deployments: Online/On-premise/Hybrid. If you don't own an Exchange Online account, the link will take you to Office 365 sign-up page.
For most of the jobs that will be performed using Exchange Admin Center (EAC), this feature-pane (at left hand side) will act as first level of navigation.
| Option | Function |
| Recipients | User-mailboxes, groups, contacts, resource, shared mailboxes etc are shared through this tab. |
| Permissions | Roles of an administrator, user roles, and the policies of Outlook Web Access (OWA) are managed through it. |
| Compliance Management | Under this tab Options for In-Place eDiscovery, data loss prevention, In-Place Holds, retention policies and tag, etc are available |
| Organization | Outlook Apps, address list, and shared data can be managed through this section. |
| Protection | Options for anti-malware security will be available here. |
| Mail flow | This includes options that help to manage the mail messages like delivery of an email, send/receive connectors, policies for email address and the rules set for incoming or outgoing mail. |
| Mobile | Settings that help to connect Exchange Server with mobile applications will be available here. |
| Public Folders | Exchange 2013 public folders are managed through this option (note: not the legacy public folders). |
| Unified Messaging | Through this, there is option to manage the UM Dial plans and the IP gateways. |
| Servers | Mailbox Server and Client Access Server (CAS) can be managed through this option. This includes DAG, virtual directory etc. |
| Hybrid | Setting up Hybrid Exchange is possible, i.e. on-premise Exchange can be connected with online Exchange. Required settings can be done here. |
For every option in feature pane at the left, there are multiple tabs at the right side that acts as a second-level of navigation. Basically this helps in customization of facilities that are being offered under every option in feature pane.
Whenever any tab is selected, a list can be seen at bottom-right of the panel. In Exchange Admin Center, the limitation of list view has been covered up that existed in Exchange Control Panel (Exchange 2010 edition). In ECP, a maximum of 500 objects can be viewed in the list while this has been expanded to 20,000 objects for on-premise Exchange 2013 and 10,000 objects in Exchange online. In addition to this, the list can be viewed in pages.
When an object from list view is selected, its details can be viewed within the Details Pane. For example: When we move to Recipients to Mailboxes and select any mailbox from the list pane, its details can be viewed in the details pane at the right side of the dialog box. There are options to manage the mailbox like enabling or disabling mailbox achieving. Also, bulk editing can be done by selecting multiple objects from list view using the CTRL key.
The toolbar comprises of icons that help to perform certain tasks. The table below defines which icon in the toolbar process what type of function:
Such scenarios can be helpful in situations like: A normal meeting room can be assigned auto-acceptance for a meeting but if the number of attendees is high in number, the meeting room can be booked for a maximum of one hour.
| Icon | Name | Action |
 |
Add, New | This icon is used for creating a new object. It has a down arrow associated with it so that if an option has an expansion, it can be made through the arrow. Example: Navigating to Recipients >> Mailboxes and clicking on down arrow further displays User Mailbox and Linked Mailbox. |
 |
Edit | Any modification to be down in an object can be made using this edit icon. |
 |
Delete | Use this icon for deletion of an object. This also includes a down arrow so that additional options can be viewed related to deletion. |
 |
Search | Type in any keyword or phrase to search for it. Enter the word/phrase in the search box. |
 |
Refresh | After any changes in the list view, check out the modifications by refreshing it. For this, use the Refresh button in toolbar. |
 |
More Options | Click on this icon and it will display the list of actions that can be performed on specific object. For example: Under Mailboxes, when more options is selected, choices like Disable, Add/Remove Columns, Advance Search etc will be displayed. |
 |
Up Arrow and Down Arrow | Use the up/down arrows in order to select the priority option amongst the various available choices. |
 |
Copy | This will help to make a copy of original object and make changes in it without affecting the original object. |
 |
Remove | For removing any item from the list, click on this icon. |
This is one of the helpful components of Exchange Admin Center (EAC). The notification viewer displays the status of any on-going process or regarding its completion. This proves extremely convenient while performing tasks that take time like Move Mailbox request where there is choice to receive email notification regarding the progress of process.
This is used when the users want to log-out from Exchange Admin Center or need to log-in as another user. Also, using the drop down menu, following actions can be performed:
For security purpose, some organizations might want to disable Exchange Admin Center for internet users. Use the following command to turn off internet access to EAC:
Set-ECPVirtualDirectory -Identity "CAS01\ecp (default web site)" -AdminEnabled $false
To check out if this worked, enter internal and external URL to start EAC. If "404 – website not found" is displayed, it means EAC is being turned off.